Stone veneer is one of the most popular exterior upgrades in the GTA right now — and for good reason. It adds genuine curb appeal, pairs naturally with stucco and EIFS systems, and holds up long-term when installed correctly. But ‘correctly’ in Toronto means something different than in a mild climate. Our winters routinely hit −25°C, summer humidity exceeds 80%, and road salt from city streets and the 400-series highways accelerates deterioration on any installation with even minor gaps in the moisture barrier.
This article walks through the professional installation process as our team at Alasya Construction performs it across Toronto and the GTA — not a generic DIY guide, but the actual steps that determine whether a stone veneer installation lasts 30 years or fails in five.
Before You Start: Substrate Assessment in Toronto Conditions
Is Your Wall Ready?
The most critical decision before any stone veneer installation is honest substrate assessment. In Toronto’s housing stock — older brick from the 1950s–1980s, modern framed construction, and everything in between — substrate conditions vary enormously. Loose brick, soft mortar, moisture-damaged sheathing, and previous poor-quality parging are all common in GTA homes.
Before applying stone veneer, your substrate must meet all of the following:
- Structurally sound and stable with no active movement
- No moisture infiltration from above or behind the wall
- Any compromised existing parging or cladding removed — not covered over
- All cracks in underlying masonry repaired and fully cured
Skipping this step is the most expensive mistake made in Toronto stone veneer installations. Water behind the veneer in a freeze-thaw cycle will destroy the installation from inside within a few seasons.
Tools and Materials Required
For a professional exterior installation in Ontario, you’ll need:
- Moisture barrier / waterproof building paper (minimum 6-inch horizontal overlap)
- G-90 galvanized metal lath for framed walls
- Galvanized nails or screws penetrating studs at minimum 1 inch
- Masonry cement and sand for scratch coat (1 part cement : 2.5 parts sand)
- Stone veneer mortar — climate-rated for Ontario’s thermal cycle; do not substitute general-purpose adhesive
- Angle grinder or mason hammer for cutting
- Masonry trowel and joint tool
- Grout matched to stone colour
- Soft nylon brush (never wire — wire scratches stone surfaces)
- Flashing material for all horizontal transitions
Note on mortar for Toronto’s climate: standard mortar mixes are not appropriate for Ontario exteriors. The mortar needs sufficient flexibility to accommodate the 60°C thermal swing between winter lows and summer highs. Your stone veneer supplier — we work with Arriscraft, Permacon, and Stone Selex in the GTA — can specify the correct product for your project.
The Professional Installation Process, Step by Step
Step 1 — Apply the Moisture Barrier
For framed exterior walls, apply waterproof building paper horizontally with a minimum 6-inch overlap between sheets. This is not optional on Toronto exteriors. Road salt spray, freeze-thaw cycling, and the GTA’s wet spring conditions mean any gap in the moisture barrier will eventually be found by water.
Step 2 — Install the Metal Lath
Fasten galvanized metal lath with nails spaced a maximum of 6 inches vertically and 16 inches horizontally. Nails must penetrate studs at least 1 inch. For concrete substrates, metal lath is not required, but the surface must be clean, free of paint and efflorescence, and properly profiled for adhesion.
Step 3 — Apply the Scratch Coat
Mix 1 part masonry cement to 2.5 parts sand. Apply uniformly to the metal lath and scratch horizontal lines before it sets. Allow to cure completely — at least 24 hours in normal conditions, longer in cold weather. In Toronto, never apply a scratch coat when temperatures are below 5°C or when overnight frost is expected within 24 hours of application.
Step 4 — Plan Your Layout on the Ground
Arrange stone pieces on the ground to work out your pattern before anything goes up. Plan your corners first — they are the most structurally and visually important element. Cut pieces to fit and mark the layout so you can work efficiently once mortar is mixed. Starting at corners is not optional; random starts result in awkward cuts and visible seam lines.
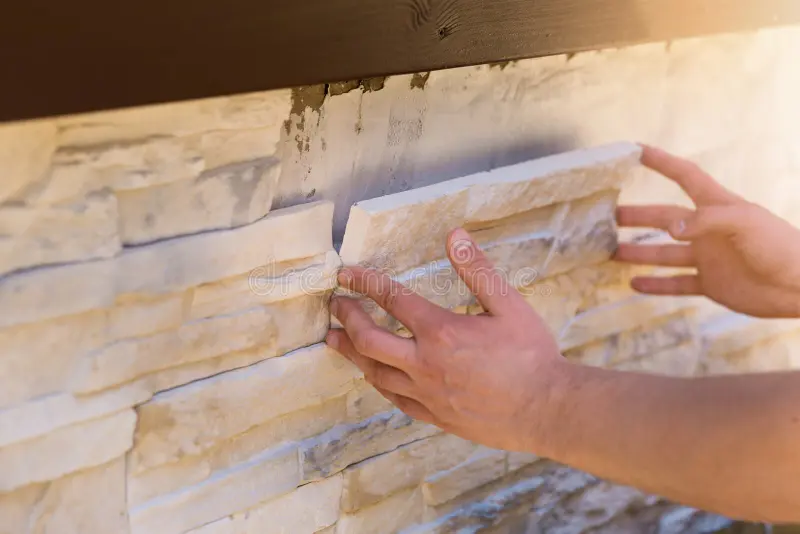
Step 5 — Apply and Hang the Veneer
Dampen the back of each stone with a masonry brush before applying mortar. This prevents the dry stone from drawing water out of the mortar too quickly, which weakens the bond. Apply approximately ½ inch of mortar to the back of each stone and press firmly onto the scratch coat with a slight rocking motion to remove air pockets.
Work bottom to top. Start with corners. Maintain consistent joint spacing. Press firmly enough that mortar squeezes out slightly at the edges — this confirms full contact between stone and scratch coat.
Step 6 — Grout the Joints
Once mortar has set (typically 24 hours), fill joints to approximately ½ inch depth with grout matched to the stone colour. As grout stiffens, remove excess with a joint tool and sweep the surface clean with a dry brush. Do not rinse with water at this stage — wait until grout is fully cured.
Step 7 — Flash All Horizontal Transitions
This step is absent from almost every consumer-facing guide, and it is the most important one on a Toronto exterior. Any horizontal surface — window sills, shelf angles, caps at the top of the veneer, ledge stones — must be properly flashed to direct water away from the wall. In Ontario’s climate, unflashed transitions are the primary cause of stone veneer failure. Water pools on horizontal surfaces, freezes, and pries the veneer away from the substrate over multiple seasons.

When to Hire a Professional
Stone veneer installation is reasonable DIY territory on small interior applications — a fireplace surround, a basement accent wall. For exterior applications in Toronto, the stakes are significantly different. Improper moisture barriers, wrong mortar selection, and missed flashing details cause failures that cost far more to repair than professional installation would have cost.
At Alasya Construction, our stone veneer team has installed and repaired hundreds of exterior applications across Toronto, North York, Scarborough, Vaughan, and Mississauga. We work with Arriscraft, Permacon, and Stone Selex materials and carry full WSIB and $5M liability coverage on all projects.
See our stone veneer installation services in Toronto and the GTA
Or call us directly for a free on-site estimate: 905-917-4568
Ready to Install Stone Veneer on Your Toronto Home?
Get a free on-site estimate within 24 hours – 905-917-4568
Serving Toronto, North York, Vaughan, Mississauga, Markham, and the GTA since 2005